时间线
时间线 编辑器用于跳转到不同的帧、操纵关键帧以及控制动画播放。
时间线。
主视图
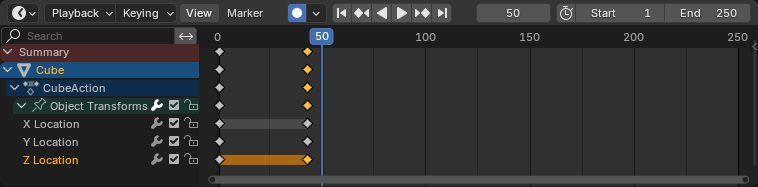
X轴表示时间,数字 0/50/100/... 代表帧号。蓝色线条是 播放头,指示当前帧,菱形符号是 关键帧,即您在特定时间为特定属性指定某个值的位置。
调整视图
可通过拖动 鼠标中键 来平移。
可通过拖动 Ctrl-鼠标中键、滚动鼠标 滚轮 或按 数字键盘减/数字键盘加 来缩放。
您还可以使用位于编辑器底部和右侧的滚动条。
播放头
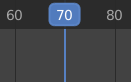
播放头。
The Playhead is the blue vertical line showing the current frame number.
It can be moved to a new position by clicking or dragging LMB in the scrubbing area at the top or by click and drag Shift-RMB anywhere in the timeline.
While dragging it can snap to elements of the editor in which it is dragged. - Seconds - Frames - Markers - Strips - Keys
It is only possible to snap to elements that are visible in the editor in which the playhead is dragged. For example having "Strips" enabled but dragging in the Graph Editor will do nothing. Snapping can be toggled during scrubbing by holding down Ctrl.
Snapping to seconds or frames can have a custom increment for example snapping to every third frame. This is always relative to the first frame of the scene and ignores the preview range. In contrast to the other snapping options, seconds and frames will always snap to the closest position, regardless of the snap distance set. When mixing options, the system will first try to snap to elements that are snapped by distance. Only if no element is close enough will it snap to seconds or frames.
You can also move it in single-frame increments by pressing Left or Right or Alt-Wheel. To jump to the beginning or end frame (of the ends of the preview range if that is active) press Shift-Left or Shift-Right.
吸附
参考
- 菜单:
播放头吸附功能可将播放头吸附到帧、标记或关键帧等特定元素上,从而帮助您在刷新时间线时精确定位播放头。
- 使用吸附
在移动播放头时启用或禁用吸附行为。
- 吸附距离
在吸附到目标之前,播放头与目标之间的最大距离(像素)。
- 吸附目标
指定播放头可以吸附到的元素:
- 帧:
吸附到帧间隔。
- 秒:
吸附到秒间隔。
- 标记:
吸附到时间线标记。
- 关键帧:
吸附到动画关键帧。
- 片段:
吸附到片段的起点和终点(例如在视频序列中)。
- 帧步长 帧
使用 帧 目标时,每个吸附点之间的帧间隔。
- 秒步长 秒
使用 秒 目标时,每个吸附点之间的秒间隔。
帧范围
The Frame Range determines the length of the scene's animation. By default, it's set to start at frame 1 and end at frame 250. You can change this using the Start/End inputs in the Timeline header, or in the Output Properties.
关键帧
By default, the timeline only shows keyframes for selected items. You can make it show all keyframes by unchecking .
You can click a keyframe to select it (and deselect all others), or click it while holding Shift to add it to the selection (or remove it if it was already selected). You can also drag a box to select multiple keyframes in one go.
To move the selected keyframes, simply drag one of them. Alternatively, you can press G, move the mouse, and click LMB to confirm (or RMB to cancel). You can also press S to scale the keyframes in relation to the Playhead.
标记
有关详细信息,请参阅标记页面。
标题栏

Popovers for Playback and Keying; transport controls; and frame controls
菜单
回放弹出菜单
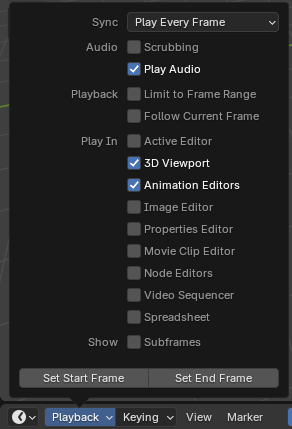
- 同步
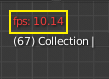
3D视图红色帧速率(FPS)。
If animation playback can't keep up with the desired Frame Rate, the actual frame rate (shown in the top left corner of the 3D Viewport) will turn red, and the Sync option determines how the situation should be handled.
- 播放每帧
播放每一帧,即使这会导致动画播放速度比预期的慢。
- 丢帧
如果播放速度慢于场景的帧频,则丢帧。
- 同步到音频
如果播放速度太慢而无法与音频保持同步,则丢帧。
- 音频
- 拖拽播放
Play bits of the sound in the animation (if there is any) while you drag the Playhead around.
- 播放音频
取消勾选可使所有声音静音。
- 回放
- 限于帧范围
Don't allow moving the Playhead outside of the Frame Range using the mouse.
- 跟随当前帧
Automatically pan the view to catch up when the Playhead goes off screen.
- 播放于
Which editors to update on each animation frame. If an editor is unchecked, it'll only be updated once playback stops (with some exceptions where it'll update on each frame anyway). When starting playback in either the Graph Editor, Dope Sheet or the NLA Editor, all editors will play back regardless of the settings. This is a feature requested by animators to easily play back all views.
- 显示 -- 子帧
Display and allow setting fractional frame values for the current frame.
- 设置起始/结束帧
Set the scene's start/end frame to the current frame. If the Preview Range is active (see Frame Controls), that one is changed instead.
插帧弹出菜单
插帧 弹出菜单包含影响关键帧插入的选项。
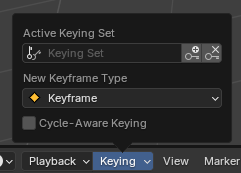
- 活动插帧集
时间线插帧集。
A Keying Set is a named collection of animatable properties. If you select one and then press I while not hovering over any input field, Blender will create keyframes for the properties in that keying set.
If you don't have a keying set selected, you'll get keyframes on a default set of properties instead (e.g. Location/Rotation/Scale for objects).
There are a number of predefined keying sets, but you can also create your own in the Keying Sets panel.
- 插入关键帧 I
于当前帧插入关键帧。
- 删除关键帧 Alt-I
于当前帧删除关键帧。
- 新关键帧类型
新创建关键帧的关键帧类型。
自动插帧
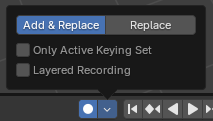
自动插帧按钮。
When the record button () is enabled, Blender will automatically create keyframes on the current frame whenever you transform an object or bone in the 3D Viewport (or change one of its transform properties in the Properties Editor).
One special use case is to record a camera path as you fly through the scene. See Fly/Walk Navigation.
Note
Auto Keying only works for transform properties (Location, Rotation, Scale). It won't create a keyframe if you change, say, the color of a material -- you still have to do that manually.
- 模式
- 添加 & 替换
按需添加或替换关键帧。
- 替换
仅替换已有的关键帧。
- 仅活动插帧集
By default, Auto Keying will create keyframes even for properties that are not in the active keying set. Use this checkbox to change that.
- 分层记录
为动画上的每个循环/通道添加一个新的非线性动画轨道,以便进行无损调整。
菜单
视图菜单
- 调整上一步操作
显示一个弹出面板,用于更改上次完成的操作的属性。请参阅:调整上一步操作。
- 通道
Show or hide the Channels region (the tree of objects and animatable properties on the left).
- 框显全部 Home
平移并缩放视图,以便所有关键帧都可见。
- 框显场景/预览范围
将水平视图重置为当前场景范围,如果预览范围处于活动状态,则将其考虑在内。
- 转到当前帧 数字键盘0
将播放头置于时间线中心。
- 显示标记
显示标记区域(如果已定义了任意标记)。禁用后,标记菜单也将隐藏,且标记操作在编辑器中不再可用。
- 显示为秒 Ctrl-T
Shows the time on the X axis and the Playhead as timestamps instead of frame numbers. A timestamp such as
01:03+02means "1 minute, 3 seconds, 2 frames."- 同步可见范围
Synchronizes the horizontal panning and scale of the editor with other time-based editors that also have this option enabled. That way, they always show the same section of time.
- 仅显示已选中
仅显示与选定项目相关的关键帧。这可能是物体、骨骼、节点等。
- 仅显示错误信息
仅显示已禁用或有错误的曲线和驱动。对调试很有用。
- 缓存
- 显示缓存
要在时间轴上显示的模拟的缓存。
烘焙的模拟将显示为完全不透明,缓存的模拟将显示为略微透明,无效的缓存将显示为略微透明并带有深色斜线条纹。
时间线缓存。
- 面光
区域控制,详见用户界面文档以获取更多信息。
标记菜单
标记用于表示动画中具有关键点或重要事件的帧。像大多数动画编辑器一样,标记显示在时间线的底部。

动画编辑器中的标记。
有关不同标记工具的说明,请参阅编辑标记。
播放控制
这些按钮用于设置当前帧并控制播放。

传输控制。
- 跳转到开头 Shift-左←
将播放头设置为帧范围的起始位置。
- 跳转到前一关键帧 下↓
将播放头移动到上一个关键帧。
- 倒放 Shift-Ctrl-空格键
开始以倒放方式播放动画。
- 播放 空格键
开始播放动画。
- 跳转到下一个关键帧 上↑
移动播放头到下一关键帧。
- 跳到结尾 Shift-右→
设置播放头到帧范围结束点。
- 暂停 空格键
停止播放动画。
帧控制
- 当前帧 Alt-滚轮
The number of the frame that's currently being displayed in the 3D Viewport. This is also the location of the Playhead.
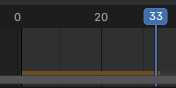
- 使用预览范围
The Preview Range is an alternative Frame Range that you can use for focusing on a particular part of the animation. It lets you repeatedly play a short segment without having to manually rewind or change the frame range of the entire scene.
This range only affects the preview in the 3D Viewport; it doesn't affect rendering.
The boundaries of the Preview Range are shown in dark orange. You can quickly configure and enable it by pressing P and dragging a box. To disable it, you can press Alt-P.
- 起始、结束
场景(或预览范围,若启用)的起始/结束帧。